Show Posts

This section allows you to view all posts made by this member. Note that you can only see posts made in areas you currently have access to.


Messages - L.A.B.

Pages: 1 2 [3] 4 5 ... 112
31
British Bikes / Re: T100 68 lighting problem
« on: May 19, 2020, 07:02:44 PM »
Hi LAB thanks for the reply I may have fkd up here (bike is + earth) as I have only 2 wires going from the new loom to the ammeter

brown/white & brown/blue no other wires at all

 I installed  the new Lucas single phase 120 watt reg/rec as per the instructions ie: discard original diode & rectifier

 connect  2 x yellow wire from the stator then a black neg to the battery ( new reg/rec has 4 wires only 2 yellow 1 black 1 red )
 
and a red pos to earth/ground so do I still need a wire from the ign. switch to one side of the ammeter?


Unfortunately, reg/rec instructions often don't take into account the presence of an ammeter.   


so do I still need a wire from the ign. switch to one side of the ammeter?

What you need to do is completely disconnect the black negative wire from the battery and reconnect it to the ignition switch side of the ammeter.

It is probably charging as it is connected now but because the negative wire is connected to the 'wrong side' of the ammeter it won't show 'charge'. 

32
British Bikes / Re: T100 68 lighting problem
« on: May 19, 2020, 04:10:51 PM »


my rectifier is a new Lucas single phase 120 watt unit with a Lucas 47205 stator


How is the "rectifier" (presumably you mean regulator/rectifier) connected?

For the ammeter to show 'charge' the reg/rec negative wire (assuming positive earth?) must be connected to the ignition switch side of the ammeter which is the side with the brown/white wire. 


33
Identify these bikes! / Re: A tricky identification!
« on: March 25, 2020, 04:33:57 PM »
It's a fairly recent Triumph T100 Bonneville and not an 'older' (if that's what you meant?) classic.

https://www.bennetts.co.uk/bikesocial/reviews/bikes/triumph/triumph-bonneville-t100---first-ride-and-review

34
British Bikes / Re: Norton twin leading shoe front brake.
« on: December 20, 2019, 11:57:49 AM »
I’m also assuming by looking at the Andover Norton parts drawing and your comment about moving it to one side that the central spacer tube isn’t strong enough to be used as a drift to drive the first bearing out.

It's the same ID as the bearings so you can't really use it as a drift as there's nothing to get hold of. Once one bearing has moves a bit the tube becomes free so you can get at the further bearing easily enough.

I'd recommend getting hold of a decent workshop manual - the "official" Norton Villiers one if it's a Commando.

The procedure for removing the drum front wheel bearings is given in section H9 of the factory manual where the spacer tube is intended to be used (along with the wheel spindle) to drive out both bearings.

I don't know if the rest of the bike (assuming there is one) is a Commando or not in which case getting hold of a hard copy manual would be something of a waste of money and only contain the same information as the online manual in the link I've posted.   

35
British Bikes / Re: Norton twin leading shoe front brake.
« on: December 20, 2019, 10:14:29 AM »
I’m also replacing the wheel bearings, there is a washer in the right hand housing that has been ‘crimped’ in place. I use the word crimped, it looks more like the housing has been bashed with a blunt chisel. This looks like a factory bodge rather than a shed bodge. I’m assuming the right hand bearing is removed from the right hand side and these ‘crimps’ have to be ground away first.


http://britmoto.com/manuals/Manuals/750_man.pdf
Section H9.

A stiffening kit was fitted to later Commando front drum brakes.

The kit is available from Andover Norton, RGM Motors, etc.:
https://andover-norton.co.uk/en/shop-details/16081
https://www.rgmnorton.co.uk/buy/twin-leader-stiffening-kit-not-for-rgm-twin-leader-commando_2462.htm

Not a personal recommendation (as I don't have the drum brake on my Commando) but RGM's MZ gold shoes are supposed to be an improvement.
https://www.rgmnorton.co.uk/buy/rgm-front-brake-shoes-mz-gold-for-2ls-twin-leading-shoe-high-friction_2441.htm

36
British Bikes / Re: B31 spluttering and flashing back through carb
« on: November 16, 2019, 11:23:43 PM »
We  have been confused too! By the information in the parts books

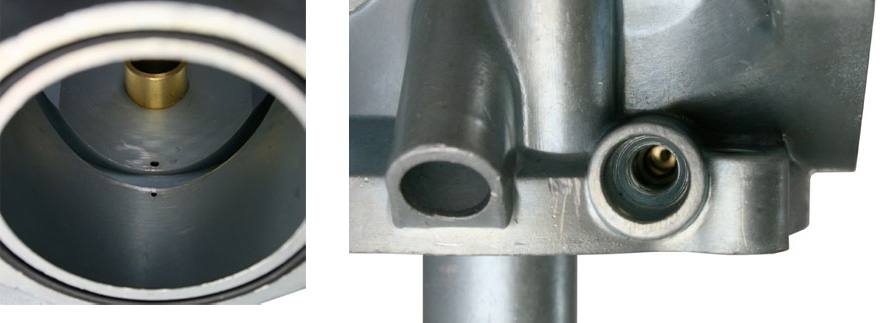
Item 20 is clearly a screw fitted into the underside of the carburettor body hence a threaded tapping in the underside.

And we have studied a number of manuals , none of which tell us that the pilot jet is hidden away behind the pilot air screw.

Unless it's a 2-stroke or very early 4-stroke Mk1 Concentric then it would normally have the pressed in pilot bush which can be seen when the pilot air screw has been removed (RH image, below and which often becomes blocked see Bushman's link) and NOT the item 20 pilot jet.

http://accessories.hitchcocksmotorcycles.com/Amal-Carburettors/Amal-MK1-Concentric-Hints-and-Tips/How-it-Works-and-Part-Names
"On most 4 stroke models no pilot jet is fitted, but a pilot bush is inserted in the continuation of the pilot air adjusting screw passage."

http://amalcarb.co.uk/rebuilding-mark-1-concentric-carburetter

http://www.jba.bc.ca/Bushmans%20Carb%20Tuning.html


It is not a premier carb.
The wassel carb however does have the premier type adjustable pilot jet  but fares no better (worse in fact)  hence it was taken off again and the original refitted.

The Amal Premier and Wassell Evolution carbs have removable pilot jets in the same position as the pilot bush which can be adjusted by fitting either a larger or smaller jet.

There is no screw adjustment so they should be screwed fully home and the idle mixture adjusted using the pilot air screw.


37
British Bikes / Re: T140 regulator/rectifier replacement
« on: July 14, 2019, 10:08:46 PM »
were there any benefit over the original setup, eg starting/running etc,

As iansoady said, unless the existing charging system is faulty then you are unlikely to notice any difference in starting and running.


and how easy/hard are they to fit?

(Positive earth T140V)
A simple matter of disconnecting (or removing) the rectifier and Zener diode, and, depending on where the box is to be mounted, connecting the four reg/rec box wires to the existing wiring.
These boxes normally have two yellow 'AC' wires, any one of which should be connected to the alternator stator output green/yellow and the other yellow to stator white/green.
A red (positive) connects to harness red/battery positive and, usually black (negative) connects to the harness brown/blue negative wire.   

My bike starts fairly well, only a few kicks needed, though I think would benefit from a card carb set up, as it doesn't always tick over when up to temp, unless the tick over is raised a little.

If they are the original Amal Concentric Mk1 carbs then the slides/bodies are likely to be well worn out by now in which case they will be almost impossible to keep in tune for more than a short while or maintain a steady idle without constant attention.

38
British Bikes / Re: Understanding historic threads
« on: July 12, 2019, 10:24:39 PM »
First, it must be understood that not all British threads are "Whitworth".

Whitworth (or BSW) is only one type of British Standard thread used on British motorcycles.

Quote
I’ve purchased a Witworth screw thread pitch measure gauge and measured the thread on the old studs, which appears to be 26G.

26 threads per inch (TPI) is more likely to be CEI/BSC (Cycle Engineers Institute later British Cycle Thread) which is not a Whitworth thread and CEI/BSC is a common thread found on British motorcycles.

Quote
The diameter of the stud is 11mm.

I suggest you try to keep to Imperial measurements so 11mm is probably going to be 7/16".

Other threads commonly found on British motorcycles are BSF, BA and BSP, plus BSA also used some of their own special threads.

These websites should be of some help in understanding British threads:

http://www.sat.dundee.ac.uk/~psc/spanner_jaw.html#Background
https://britishfasteners.com/threads/index.html


39
British Bikes / Re: T140 strange oil leak
« on: July 12, 2019, 04:39:07 PM »

Sorry, yes, it's an S reg = 1998 T140V, a positive earth model.

1978.


There is no breather from the exhaust rocker cover anywhere, just the crank breather where it exits behind the barrels on the left.

Yes, for a 1978 T140V that's normal as I previously described. The T140E, also T140D and later T140 models had the exhaust rocker-box breather connection, not 'V'.


It does chuff a little smoke on over run, which suggest worn valve guides or rings ?

Probably, but could carry on like that for ages. 


Though why would oil, not just fumes, be exiting from the breather behind the head stock?

More likely it is being forced up the tube from the engine breather connection so it sounds as if that pipe joint is not secure and could be leaking?


Could it be pressurising the oil in the frame, A - because there is no exhaust rocker breather, and/or B - because the valve guides/bores are worn, and therefore sending it out the frame breather that way, along with some oil ????

I wouldn't have thought so. If there is any pressure then it's probably coming from the engine breather.


Also, where does the exhaust rocker cover actually breath from,

A 'V' would breathe through the exhaust pushrod tubes to the crankcase same as the inlet rocker box does through the inlet pushrod tube, not that there is much breathing taking place in the rocker-boxes just that the exhaust rocker box is a convenient place to have the breather to frame connection on the E model. 


as my last 1981 T140V didn't have a breather there either?

Unless it was 1981 registration, T140V production ended in 1978 so a 'V' can't be later than 1978 model year.


40
British Bikes / Re: T140 strange oil leak
« on: July 12, 2019, 09:06:00 AM »
All is fairly well, apart from a serious short when the neg terminal wire touched the frame and burnt out 2 wires. A pain, though a fairly easy fix.

1979 is the model year they changed to negative earth electrics so are you sure it's a 1979 model? 


What has me scratching my head is an oil leak. An oil leak I get, it's a Bonnie. It's where it is coming from that really puzzles me. There is a fairly constant drip/dribble from the bottom of the head stock, which does not make sense !
I get it's an OIF model, though the max oil level is much lower than where it is coming from, and I don't understand how it gets there, to then leak out, over pretty much everything, as the wind does a great job in covering pretty much everything behind where it leaks from.

The T140 frame oil reservoir has a breather vent immediately behind the headstock between the plates and should have a hose connecting it to the exhaust rocker-box on T140E models (or a connection to the atmospheric engine breather on earlier T140V models) so the oil could be coming from there? 


41
British Bikes / Re: Triumph T120 engine number
« on: April 06, 2019, 10:29:15 AM »
It's a 1973 model-year too.

'G' is 1972 model year. 'NG' is build date October(N) 1971 as 1972 model year T120 production started at HG 30870, July(H) 1971.

As for the rest the meridan strike/workers crap out/ it was a total balls up, they probably destroyed the records out of spite/or never kept any/or were pissed [on or off] at the time they stamped the numbers, or maybe one bloke stamped numbers,the other did the letters and the work experience kid wrote it down.

The Meriden workers would have no reason to destroy the production records of what became the Meriden Co-Operative!

The production record for frame NG ?xxx? almost certainly exists - if legitimate and should be held by the VMCC and TOMCC.
The engine number, however, is unlikely to be a 'factory' number.   


42
The Classic Biker Bar / Re: Help needed with engine displacement size ??
« on: February 11, 2019, 07:17:00 PM »
I have measured the bore at 68.5mm and the piston from its very bottom of stroke to very top of stroke travels 75mm. According to the online calculator I used it is a 276cc ? Have i got this right ?

Yes.


With the angled top on the piston does this have any bearing.

No.

44
British Bikes / Re: bsa lightning
« on: December 04, 2018, 10:50:33 PM »
its blue box, the exact kit you have kindly shown, the exact same coils etc

You say "coils"? I assume you mean the single dual output coil as shown in the picture and not two separate single output coils?

If you do actually mean two separate single coils then how are they wired?


the modern type regulator/rectifier dosent seem to have a makers name on it, these modern add ons are all a good idea but bypass the makers manual,

Does charging system appear to be working normally? Have you checked the voltage (both battery and charging)?

another thought is could the earth on the coils be maybe not good enough? as they are not earthed direct from the fixing because they had to be cable tied to the frame and couldn't be fixed to it,

According to the Micro-Power instructions (below), only the (+) terminal (of the dual coil) has to be earthed (the coil body is plastic) and only if positive earth.

http://www.boyerbransden.com/pdf/KIT00281.pdf


45
British Bikes / Re: bsa lightning
« on: December 03, 2018, 10:20:22 PM »

its boyer ignition with a duel small modern type coils
 which I assume is 12 volt as the rest of the bike, its a lot of years since I messed with brits but to me the spark always looked small,

Which Boyer ignition?
The only Boyer ignition to use the miniature coils is the digital (blue box) Micro-Power ignition.

If it is the Micro Power then it would normally have one dual output 12V miniature coil.


Other Boyer systems such as Micro-MkIII, Micro MkIV, (both black box) and Micro Digital (red box) must use conventional coils, normally either two 6V coils connected in series or one conventional 12V dual output coil.


it also has a management box,

What make/type of "management box"? I assume you mean a regulator/rectifier?


Pages: 1 2 [3] 4 5 ... 112