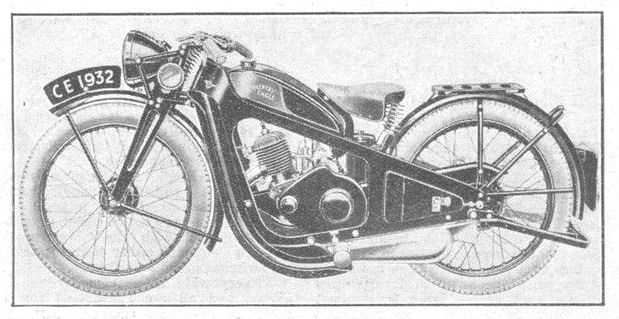
81
British Bikes / Re: Troubleshooting a JAP Special
« Last post by Rockburner on January 30, 2026, 10:57:08 AM »Bit of progress tonight.
I got fed up of picking away at the carbon deposits with a dental pick (it worked, but t's bloody slow), so I thought $%^&& it, and banged the valve guide out so I had unhindered access. And I could clean up the valve guide itself more easily. Having seen it done, and knowing that it's literally a hammer job, made me far more confident to do it.
Valve guide in improvised "gentle" vice (I really need to make up some ally / wood chuck covers for the big vice.

Much improved exhaust manifold!


I'm very aware that "polishing" the manifolds isn't going to gain me much, the engine is such low compression any gains are going to be minimal, but I wanted to do a "good job" on Dad's bike, and be proud of the end result (if I ever get there!), knowing that I did everything I could.
When I re-inserted the guide (it went in pretty easily, much as I had seen happen on Saturday), the outer end had been slightly peened closed (it happens) and I needed to ream out the guide. Luckily, I discovered that the 1 reamer I picked up from Dad's workshop was the right 11/32" size (funny that... :roll: ). Unfortunately it's a tapered shank, so I had to bodge it a bit and rotate it by hand using mole grips... :roll: But - it worked a treat and the valve is a nice snug fit in the guide.
I also polished up the valves (no photos, sorry), they're lovely now.
I then turned my attention to the valve springs. I wanted to check they were all still serviceable. The JAP guru I saw on Saturday had a lovely, expensive, american made tool for this - but he also described a manner of doing this using a drill press and a set of scales. So, I'd bought myself a set of postal scales that are up to the job: the desired spring weight is 145lb so a cheap set of kitchen scales ain't gonna cut it.
Unfortunately using it in the drill press didn't really work out, so I improvised...


Might not be absolutely perfect to the micro-ounce.. but close enough for comparing the 4 different sets of valves that have against each other (at least).
I measured up all the springs I have - using a micrometer set to the correct length: 1.375"
The calculation is :
Desired spring length (compressed) : 1 5/16", Desired Spring weight at that length : 140-145 lb.
So - the cup and the plate within the cup that the springs sit in are 1/32" thickness each (where the springs bear) : added together that's 2/32" = 1/16"
So - add the cup & plate to the desired spring length and you get 1 6/16", or 1 3/8" = 1.375" (which is nice and easy to set on the micrometer, then lock off).
So - compress the springs, in the cups (with plates at each end), and measuring from the top of the outer spring (ignoring the top plate) to the flat sheet the cup is resting on. (In the head, you measure from the top surface of the head to the top of the outer spring, so this is the same measurement).
Results: Weight measured at spring length of 1 3/8" (inc cup & plate)
Head 1 inlet : 129 lb
Head 1 exhaust : 129 lb
Head 2 inlet : 151 lb
Head 2 exhaust: 145 lb.
So - the original springs are knackered. booo!
However - we have some nice springy springs from the "new" head. (albeit maybe a little over-enthusastic...)
I started mixing and matching to get roughly the right spring weight, but so far have only tried one combo:
Head 2 inlet outer + Head 1 inlet inner : 149 lb.
I'm going to play about with mixing the springs and get 2 pairs as close to 140/145 lb as I can. I think the measurement system is close "enough" for this. I was told on Saturday that if the spring weights are over 155 or so then they're too strong and they'll cause undue wear to the head. Given that head 2 is badly pocketed already I'm not wanting to take chances. Although Head 1 does had replacement valve-seats, so it's in a better condition.
Oh yeah - I also put the rocker arms and their accompanying accessories through the ultrasonic. Unfortunately I think I may have lost one of the frigging rollers though GAH! (mind you - I know I have a couple of spares because there were one too many in 2 of the assemblies!) Going to have to be a lot more careful with those little $%^&&ers.
I got fed up of picking away at the carbon deposits with a dental pick (it worked, but t's bloody slow), so I thought $%^&& it, and banged the valve guide out so I had unhindered access. And I could clean up the valve guide itself more easily. Having seen it done, and knowing that it's literally a hammer job, made me far more confident to do it.

Valve guide in improvised "gentle" vice (I really need to make up some ally / wood chuck covers for the big vice.

Much improved exhaust manifold!


I'm very aware that "polishing" the manifolds isn't going to gain me much, the engine is such low compression any gains are going to be minimal, but I wanted to do a "good job" on Dad's bike, and be proud of the end result (if I ever get there!), knowing that I did everything I could.
When I re-inserted the guide (it went in pretty easily, much as I had seen happen on Saturday), the outer end had been slightly peened closed (it happens) and I needed to ream out the guide. Luckily, I discovered that the 1 reamer I picked up from Dad's workshop was the right 11/32" size (funny that... :roll: ). Unfortunately it's a tapered shank, so I had to bodge it a bit and rotate it by hand using mole grips... :roll: But - it worked a treat and the valve is a nice snug fit in the guide.

I also polished up the valves (no photos, sorry), they're lovely now.

I then turned my attention to the valve springs. I wanted to check they were all still serviceable. The JAP guru I saw on Saturday had a lovely, expensive, american made tool for this - but he also described a manner of doing this using a drill press and a set of scales. So, I'd bought myself a set of postal scales that are up to the job: the desired spring weight is 145lb so a cheap set of kitchen scales ain't gonna cut it.
Unfortunately using it in the drill press didn't really work out, so I improvised...


Might not be absolutely perfect to the micro-ounce.. but close enough for comparing the 4 different sets of valves that have against each other (at least).
I measured up all the springs I have - using a micrometer set to the correct length: 1.375"
The calculation is :
Desired spring length (compressed) : 1 5/16", Desired Spring weight at that length : 140-145 lb.
So - the cup and the plate within the cup that the springs sit in are 1/32" thickness each (where the springs bear) : added together that's 2/32" = 1/16"
So - add the cup & plate to the desired spring length and you get 1 6/16", or 1 3/8" = 1.375" (which is nice and easy to set on the micrometer, then lock off).
So - compress the springs, in the cups (with plates at each end), and measuring from the top of the outer spring (ignoring the top plate) to the flat sheet the cup is resting on. (In the head, you measure from the top surface of the head to the top of the outer spring, so this is the same measurement).
Results: Weight measured at spring length of 1 3/8" (inc cup & plate)
Head 1 inlet : 129 lb
Head 1 exhaust : 129 lb
Head 2 inlet : 151 lb
Head 2 exhaust: 145 lb.
So - the original springs are knackered. booo!

However - we have some nice springy springs from the "new" head. (albeit maybe a little over-enthusastic...)
I started mixing and matching to get roughly the right spring weight, but so far have only tried one combo:
Head 2 inlet outer + Head 1 inlet inner : 149 lb.
I'm going to play about with mixing the springs and get 2 pairs as close to 140/145 lb as I can. I think the measurement system is close "enough" for this. I was told on Saturday that if the spring weights are over 155 or so then they're too strong and they'll cause undue wear to the head. Given that head 2 is badly pocketed already I'm not wanting to take chances. Although Head 1 does had replacement valve-seats, so it's in a better condition.
Oh yeah - I also put the rocker arms and their accompanying accessories through the ultrasonic. Unfortunately I think I may have lost one of the frigging rollers though GAH! (mind you - I know I have a couple of spares because there were one too many in 2 of the assemblies!) Going to have to be a lot more careful with those little $%^&&ers.
Recent Posts


